Social bookmarking buttons are very commonly seen on blogs, and there are any number of widgets that will give you a ton of all the common buttons, such as Facebook Like, Twitter Tweet, Google +1, and so on. The Facebook 'Invite Friends' button is different in the sense that it isn't a bookmarking button. It is something much more useful - it enables users easily refer certain content to their friends, and also helps bloggers with increasing their audience. Today's how-to is all about creating an 'Invite Friends' button, and adding it to your (Blogger) blog.
What is the Invite Friends button?
You typically see this sort of button on Facebook Pages only. Page administrators can invite their friends to like their page. Other people who visit the page, and have liked it can also invite their friends. This helps with generating a new audience for your Facebook page, and hence your website or blog. You can put this button on your blog as well so that people can invite their friends from right there, instead of going to a Facebook page.

When a person clicks on the invite friend button, a new pop-up window opens. This allows them to search and select multiple friends of theirs at once. As per Facebook's limit, 50 people can be selected at a time. Clicking on the Send Requests button will send out requests to people on behalf of the sender to like the particular Facebook page.
Adding Invite Friends button to Blogger
This process involves generating a small Facebook app of your own. Go to the Facebook Developer Page, and create a new app. In order to be able to access this page, you need to be registered as a developer.
If you're not already registered as a developer, simply click on the Register button as shown. After confirmation, you will be taken to the Facebook Developers Page.
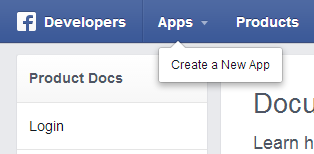
- Click on Apps > Create New
.png)
- Enter a name and identifier for your app, and then choose a category
- Copy your App ID. This will be used later

- Now, take a look at the following code. It is the code for our button, but not quite ready yet. All you have to do is, replace the ID given in this code with your own (given in bold text). You can change the other text in bold as well with your own customized message. And of course, you can customize the CSS styling.
<style>
.MBT-FB a {
font-family: tahoma, verdana, arial, sans-serif !important;
font-weight:bold !important;
font-size:12px !important;
width:150px !important;
border:solid #29447e 1px !important;
border-bottom:solid #29447e 1px !important;
cursor:pointer !important;
padding:6px 6px 6px 6px !important;
background-color:#5c75a9 !important;
border-top:solid #8a9cc2 1px !important;
text-align:center !important;
color:#fff !important;
text-decoration:none ! important;
}
.MBT-FB a:active {
background-color:#4f6aa3 !important;
}
</style>
<script src='http://connect.facebook.net/en_US/all.js'></script>
<script>
FB.init ({
appId:' 412074162260996',
cookie:true,
status:true,
xfbml:true
});
function FacebookInviteFriends () {
FB.ui ({
method: 'apprequests',
message: ' Invite your friends'
});
}
</script>
<div ></div>
<span >
<a href='#' onclick='FacebookInviteFriends();'> Invite your friends</a>
</span>
<script type='text/javascript'>
if (top.location != self.location) {
top.location = self.location
}
</script>
- Now, go to your app page, and then go to settings.

- Click on Add a new platform and then click on Website. Enter the URL of your site, and then save your changes. This step ensures access to your app from your site URL.
You're now all done! You can add the code given above anywhere on your blog!
Facing problems? Please feel free to ask in the comments section below. Hope this post helped. Cheers :)
Source : mybloggertricks[dot]com
No comments:
Post a Comment